How to draw a Telephone. Phones are essentially electronic devices in our daily lives. We use it all the time to share with family and buddies. Without a phone, we cannot connect with loved ones who aren’t by our side. Fortunately, in 1876 the foremost telephone was invented, altering the communication play forever. Nowadays, telephones are more and more sophisticated. Modern phones allow you to call someone, send messages, and take photos, surf the Internet, and much more. This tutorial will go back in time by drawing the traditional telephone. We’ve created a step-by-step tutorial on how to draw a phone, simplified with 9 quick and easy steps.
Each instruction has an illustration as a visual guide as you follow each step. Have fun, and enjoy your artistic skills! If you are looking for coloring pages, then you are at the right place because we share many types of coloring pages for kids like Christmas coloring pages, Halloween coloring pages, dog coloring pages, cat coloring pages, dragon coloring pages, horse coloring pages, and many more.
Drawing a Telephone
Step 1:
Start by drawing a slightly diagonal oval shape at the top of your paper. It creates the speaker surround, the top of the phone, which we place over our ears when we talk. Make sure the outline is drawn correctly by creating reference lines. Draw a horizontal and vertical line that intersects on the paper and use it as a guide. The vertical line above the horizontal line marks where you need to trace.
Step 2:
Draw another diagonal oval shape at the bottom right of your paper. It makes the strategy of the microphone. Remember that the speaker and microphone should not be aligned vertically. The speaker should be on the top half, while the microphone should be on the bottom right so that the phone appears diagonally.
Step 3:
Draw a curved diagonal line connecting the speaker and the microphone. It includes the hold of the phone.
Step 4:
Draw a curved line at the bottom of the enclosure. It is what links the speaker to the grip.
Step 5:
Mark another curved bar at the top of the microphone. Similar to the previous step, this connects the microphone to the handle.
Step 6:
Draw a curved line between the lines we drew in the previous steps. It connects the speaker and microphone to the phone’s grip. At this point, the phone structure should be complete.
Step 7:
After finishing the phone’s structure, we will move on to its details and patterns to make it more realistic. Continue by drawing an oval shape inside the outline of the enclosure. Note that this shape must have the same shape as the outline.
Step 8:
Duplicate the last step on the phone’s microphone. At this moment, the speaker and microphone should have an internal oval body inside.
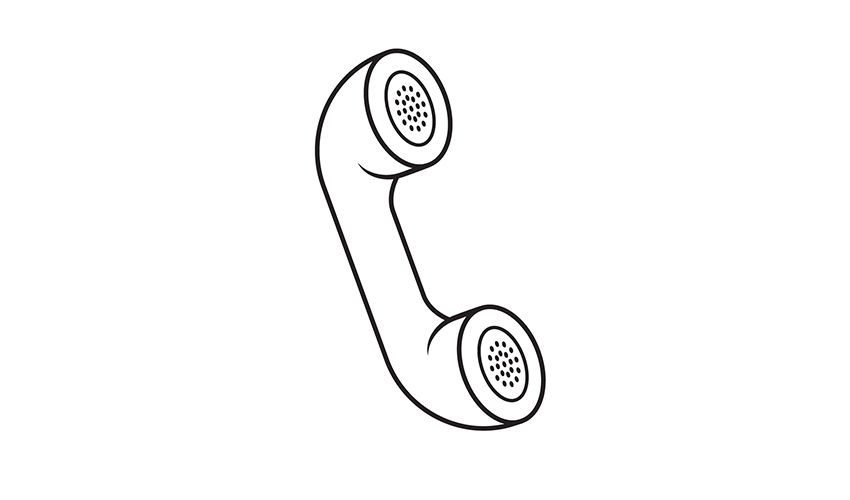
Step 9:

Draw several shaded dots inside the inner oval shapes of the speaker and microphone. It creates different holes in the speaker and microphone that help support your sound loud and obvious. There you go: we have successfully drawn a telephone! Now it’s time to move on to the multiple exciting parts: picking colors and coloring the phone.
Traditionally, phones are mostly black. Today, however, phones are becoming more modern and come in various colors. The colors you employ for the phone are up to you! Sense free to utilize any color you like. Have fun playing with colors, and watch your phone come to life!
Here’s how you can make your phone even better!
You won’t require to call a buddy for fantastic advice on your phone sketch! We concentrated only on the receiver with this phone drawing we made together. It is only one important phone part, so you can add more! First, there would be a twisted wire that attached the receiver to the body of the phone. Drawing this can be a challenge, but it will look great! Then you can remove the body of the phone. It can be a rotary phone or a standard button phone. What kind of phone are you heading to create?
If you took our advice above and added more to this phone drawing, you can add a background. The phone could be on a desk or table in a house, and you could add a few extra items around it. It would be a fun opportunity to create a fully realized environment! Where could this phone be? To make this phone sketch even more interesting, it might be fun to have a person hold it. It would also be a challenge, but it would be worth it! If you’re not used to drawing people, you can do it in a simple cartoon style.
Then you can add text to show what the person using the phone is saying! If you are having trouble with this, you can ask a friend or family member to pose with a phone to help you. Who do you think uses this phone? We chose a bright red for our sample phone drawing, but you can use any color you like! Not only that, but you can also play around with other art tools and mediums. You wouldn’t need to stick to one color, and you can even render certain patterns and shapes on the phone. It’s a great way to spice it up, so what colors will you choose?
Your phone drawing is complete!
Did you enjoy a nice drawing activity with this step-by-step drawing tutorial on your phone? The fun thing about this drawing tutorial is that it lets you customize your drawing every step of the way to perfect your artistic skills. Remember that all our drawing tutorials can be used for free as materials or references to help you draw on various subjects.
As soon as you are drawn and colored a phone, show off your artwork! Please take a photo of your drawing and share it on our Facebook and Pinterest. Drawing a phone is a feat, so you should be proud of your masterpiece! We’d love to see your realistic and colorful phone drawing!
Also Read: Web Conference Software Market to be Driven