How to Draw the White House
I am drawing the White House in just six easy steps! Owning a house of any size or appearance is a great accomplishment, but few people can say they live in a house known to the world! You may also learn many things cartoon drawing, easy things to draw, scary drawing, pencil drawing, cool things to draw, scary drawing, creative drawing, and flower drawing.
The White House is the authorized quarter of the present President of the United States, and this recognition, along with its unique structure, has completed this estate recognized worldwide. First occupied by John Adams in 1880, it has since served as the residence of all subsequent presidents.
Due to this famous heritage and design, many people like to learn how to draw the White House. If you are also fascinated by this famous mansion, this will be a perfect tutorial! Our step-by-step guide on how to draw the White House in just six easy steps will aid you in constructing a gorgeous piece of skill celebrating this incredible facility!
How to Draw the White House: Let’s Get Started!
Step 1
Particularly, we intention remove the upper portion of the major network. This structure will be rounded and curved with a few small square turret structures built into it. Add another curved section below, and once you have our reference image, you’re ready for the next step in the guide.
Step 2 – now draw the central part a bit more.
The second step in this drawing of the White House may seem tricky, but it’s not as hard as it sounds! We will extend the middle section, mostly consisting of long, skinny pillar sections. Carefully draw these skinny pillars and add detail to the top and bottom of each. There will also be details between each pillar, so you can draw those before moving on to step 3 of this guide.
Step 3 – Draw the Final Details of the Center Section
Before moving on to the different sections of the building, we will complete the central part of this third step of our guide on how to draw the White House. To do this, we will first add some small curved stairs on either side of the base of this middle section. Next, we’ll draw some small portals with wall lanterns between them. This will conclude this middle part, and we will add more structure in the next section.
Step 4 – Following, remove the left flank of the White House.
The section we will draw in this fourth part of our guide on how to draw the White House is another one that looks complicated, but it doesn’t have to! This will be the left section of the structure, and it has a rather rectangular design. There are also slender pillars incorporated into the design of this section, and there will also be ornate window designs between these. It would be okay if you carried this step slowly while closely following our example. Then you’re ready for some finishing touches in the next step of the guide!
Step 5 – Add Final Details to Your White House Drawing
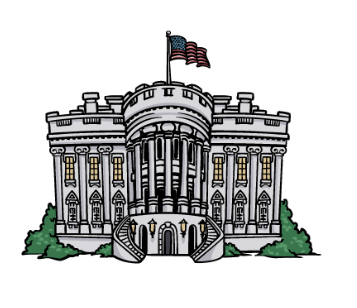
This fifth step of how to draw the White House guide will allow you to finish the last elements and details before adding color to it in the final step. First, you can mirror what you drew in the previous step by drawing the right half of the building. The details should be identical to the left side, so do your best to make it as symmetrical as possible! Next, we’ll also draw some bushes at the base of the White House, and you can create them using jagged lines.
Before moving on to the final step, add a few extra touches! One idea would be to draw a patriotic stylistic background behind the building. What kind of background can you think of adding?
Step 6 – Finish your drawing of the White House with color.
Due to the name of this building, you might be limited by the colors you can use to color it. With colors, even with a mostly white house! When coloring the building, you’ll notice that we don’t leave it completely white. Instead, we chose light gray tones for the building to create